Tuesday, May 26, 2015

WEEK 20 - OUR STORY: ME AND MY MOM

Hello again everyone and thanks for joining me for my reveal of my Layout-A-Week layout for May.  This month we were asked to look at the theme of Mom's as it is Mother's Day this month.  I decided to go WAY back to how I made MY mom a mom.

For this layout I decided to step out of my comfort zone of colours and use more vintage-y themed products and also use some more feminine touches of ribbon and flowers.  I am really quite pleased with how it turned out and think it really compliments the photo well.


SUPPLY LIST:
Vellum
Patterned paper: Pink Paislee
Alphas: Thickers, Pink Paislee
Mist: Heidi Swapp Color Shine Gold, Bronzer, Seafoam, Mint Green, Tea
Other: Ribbon, Flowers, Enamel dots, Ranger: Gesso
You can also find me at my blog:
http://scrapsbyjen.blogspot.ca/
Or on Instagram as "ScrapsbyJen"

Tuesday, May 19, 2015

WEEK 19 - WHO IS YOUR ROLE MODEL?


Hi everyone!  Felicia here with a layout of two women in my life that have given me lots of awesome examples of what it takes to be a mother, a wife, and a friend.  My mom and her best friend have been friends since their mid teens years and are still friends today and I consider these special notes from the past!  Although they live over 3,000 miles apart, you can hear them on the phone with each talking for hours on end.  They are inseparable and to have that kind of friendship for as long as they have had is priceless.  In this layout they are dressed to go to the Potentate Ball, which is located on the east coast and where they grew up together.  This photo of the both of them was taken in the late 60’s and I just had to scrap it and make it look as distressed as possible and that was a fun process. When making your pages look distressed, you can use brown inks, burn tools, or a distressed tools, which will give you great results for distressing.  Sometimes crinkling up the paper and ironing it on a light temperature works too!  Making something look distressed or aged is a fun process and you can never make mistakes, remember there are no mistakes in scrapbooking, that is what embellishments are for. 


What are your notes from the past?  Who are the women in your life that were role models for you, a mother, grandmother, or sister?  Find an older photo of a female role model that has played an influential part in your life or has been a positive role model for you (make sure you make a copy of the original photo) and scrap it.  Tell the story about how they have influenced your life in some way.  These memories are treasures for the next generation and priceless notes from the past. 


Here’s a process video for you!  Have a wonderful day!

Felicia 


Supply List:
Chocolate cardstock: Bazzill
Cream yardstick: Bazzill
Pattern paper: BoBunny
Die cuts: BoBunny
Buttons: stash
Ribbon: stash
Doily die: My Favorite Things
Chip Board: BoBunny
Letter stickers: My Mind's Eye


Tuesday, May 12, 2015

WEEK 18 - BACK TO SCHOOL

I thought that in honor of school almost being out, I would get this layout done from my sons first day of school this year.  I try to always make their own scrapbook layout to go in their Project Life School Albums.  I got Caleb's done, but I never got around to Jacob's.  So I told myself I had to finish it before this school year was finished, which for my boys is next week.

I came across this grid patterned paper and I loved it.  I love a grid looking layout.  There is something so clean about the way it looks to me.  I loved most of all the little sections on this paper, and I decided the ones I didn't care for the most I could cover up or embellish.


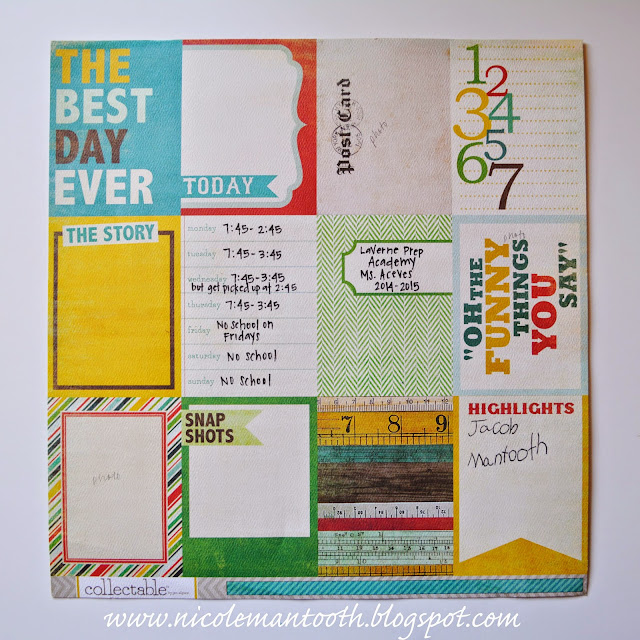
 I made myself some notes in pencil as to which ones I wanted to add photos to.  I also added some information that was perfect in some of the sections.  There was a spot with the days of the week listed, and since the kids have an nontraditional schedule, I thought this was a perfect spot to put this in there.

Another thing I always make sure to do on each of the kids school layout is their grade, school name and teachers name.  Then I make sure that somewhere on the page I have them hand write their name.  I love this element, so that we can compare each year to how their writing changes.  I always have them write it in pencil first and I carefully trace over it in pen.  Especially if they are writing right on the layout itself, this has saved us some major disasters a few times for sure.  


I printed the photos I wanted to use from thier first day so that they would fit in the boxed I wanted them to go in.  I love this too because it makes it look like they now have perfect borders around the photos. 


For the rest of the boxes, I tried to just add some basic embellishments that went with my back to school theme.  I added some word stickers all together to form somewhat of a subway art look, which I love.  I added some text stars, because to me anything with text says school and the same with stars.  
I die cut a 4 from some yellow grid patterned paper that matched the rest of the layout, and the "th" and "grade" using black cardstock and attached those right in one of the boxes. 

I finished off the last of the final touches with some yellow ruler washi tape on each photo, to give it the look that the tape was holding on each photo, and a small tiny paper clip on the top left card, that I also added to the layout.  I added a little journaling in a box that was lined and that completed my layout.  

I am excited to be able to add this to his school album and maybe this coming year I can get it done before he is about done with the school year.  

~NICOLE

You can always find me on my blog HERE at RANDOM RAMBLINGS

Tuesday, May 5, 2015

WEEK 17 - PHI SIGMA SIGMA - SCRAPBOOKING SOROITY PHOTOS

Hey everyone!  As we go into May, we will be focusing on school layouts for Teacher Appreciation Day or on Mother's Day layouts.  I decided to go the school route.  Although I don't have any pictures of teachers I haven't already scrapped, I did a page documenting my sorority in college.  These products immediately jumped out at me to make this page.  I absolutely love the way it turned out!  Please watch the video below to see my process.


Supplies Used:

  • Yellow cardstock
  • Patterned Paper: Pink Paislee, Heidi Swapp Mistables
  • Iron-On greek letters
  • Navy blue acrylic paint
  • Heidi Swapp Colorshine - Mint Green
  • Hero Arts Neon Blue paint dauber
  • Gold Lame Smooch
  • Large gold doily
  • kraft tag
  • twine
  • flowers
  • enamel dots: My Mind's Eye


Thanks so much for stopping by today.  Please leave any questions you might have!  I'd also love to see you over at my blog: The Scrap Angel.

Have a great week!