Tuesday, December 22, 2015

Lots of Pictures - Year in Review! - Week #49


Hi Ladies! Today I'm going to share with you my Layout Year in Review 2015.. It was not easy to accommodate 12 pictures in one layout so I been thinking a lot and I come up with this idea!


What I did first was decide from more than 8 thousand pictures only 12...!!! can you imagine?? It is sooooo hard! I have sorted my pictures by month so it was just a little bit easier pick up only one from each month. As I said in another post I'm not into journaling.. I love more Clean and Simple so this is the perfect example to make a Layout with a lot of pictures.


Once I decide which pictures I wanted to use I didn't like it a lot because the pictures were different sizes and I didn't like the shapes ( I recommend use the same shape for layouts with lots of pictures) and the circle punch was the perfect shape for my pictures!!


I hope you can use in your next layout lots of pictures and you can get inspiration with this layout!!!

Supplies Used:
Westcott: Cutting mat and Scissors
Xyron Mega Runner
Aleens Turbo Tacky Glue
Silhouette Cameo


Here is the video!!


Thanks for your sweet comments and don't forget to come next Tuesday to see another Layout-A-Week!!!!


Tuesday, December 15, 2015

A New Year's Resolution and Hard to Use Patterned Paper- Week #48

It's no secret that I love patterned paper. Most scrapbookers do. Certain patterns just fall right in with my style. Other just don't which means they have a tendency to sit in my stash. It's not that I hate those patterns. What is far more likely is that they may be hard to work with. Often there are parts of the design I don't want to cover up and I am unsure that cutting the sheet apart is the best answer.


 One of the prints I struggle with the most are large polka dot patterns. If the pattern is solid (IE. all large red dots) I can sort of work with it. However, there are some sheets of patterned scrapbook paper (like the one I will be working with today) in which each dot has a different design. Such a design can be busy but there are ways to make it workable while also adding dimension.

One of the easiest ways to work with a busy patterned paper is to reduce the number of photos you are working with. While we normally like to share ideas for multiphoto page layouts here at LOAW, today I will be working with just one photo. I recommend working with two at the most for a page like this one. You don't want to cover too much of the background paper which could easily happen with a lot of photos. It's also easier to maintain a focal point for your story.


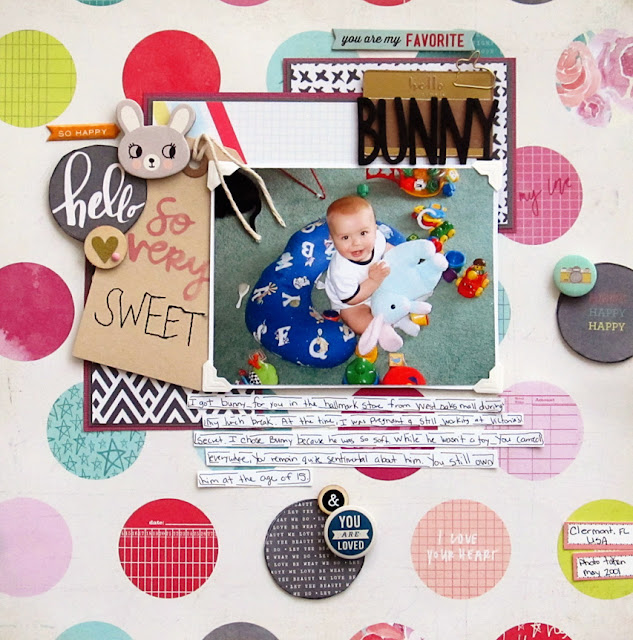
The first step in using a large polka dot print is to identify which of the dots you want to show and which ones you are ok with covering. In this case, two of the dots (what ever and But first, Glitter) don't go with the photo of my son holding a stuffed bunny. I plan to cover those by layering my photo, papers and embellishments over the top. Knowing which sections of the print will be covered will also give me an idea of where I will be placing the photo and building my design up around it.


Identify three of the polka dots that can be used to form a visual triangle around your photos and cut them out. Don't worry if one of the dots is cut off along the edge of the paper. I like to use a craft knife so that I can keep the background intact.


Cut pieces of scrap cardstock, add adhesive on the back side of the layout around the edges of the holes and then adhere the scrap piece of paper to the back of the layout.(Note: if you don't have a large polka dot print patterned paper, skip the first few steps.Instead, use a circle punch or hand cut circles from patterned paper scraps to make your own polka dot background on a sheet of cardstock.)


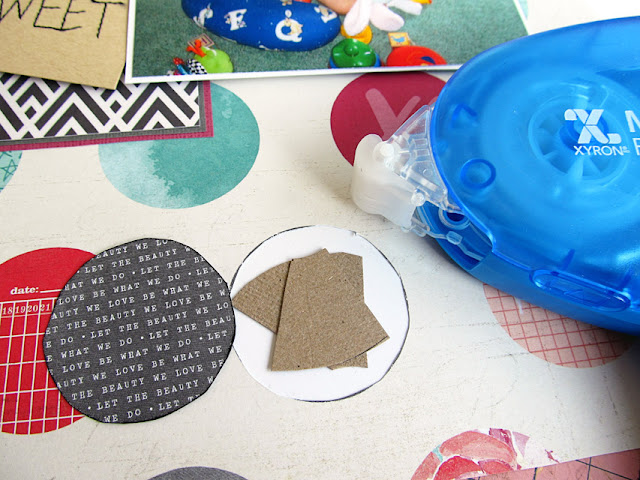
If you are concerned about unevenly cut edges, now is the time to ink the circles you cut from the background paper. Inking will help to hide any uneven cuts while also providing more definition for those particular circles. Use foam dots or layer small pieces of chipboard inside the empty circles. You are creating a platform to lift some of those dots up off the patterned paper.


It's ok to allow one or more of the dots to overlap your photo matte cluster.In fact, it makes the design more interesting.  Now that the page is complete, you can see why less photos work best on a design such as this one. To ensure the focus remained on the photo, I used a few simple pocket page cards matted with solid cardstock to create a clustered matte for the photo. You could also use scraps of paper in place of the pocket cards. Either way, choose a graphic neutral print like the graph and black and white prints shown in the layout above.

Keep embellishments to a minimum, creating a few simple clusters using the dots you chose to pop up. To help your journaling stand out, write your story on journal strips created from scrap cardstock. Outline them loosely with pen.Choose a simple, yet bold letters to help your title stand out from the page.

Popping up just a few of the polka dots helps you to create a visual triangle that will bring the focus in on your photos and your story. The raised effect creates a subtle shadowing which makes the polka dot pattern feel less flat while creating interesting dimension on your scrapbook layout.

This year, my New Year's resolution is to use more hard to use patterned papers?What your hard to use patterned paper print? Do you still find ways to use it or does it stay stuck in your stash?

Supplies Used:
Adhesive: Xyron
Craft Knife: Westcott Brand


Tuesday, December 1, 2015

Make An Ephemera Collage - Week #46

In December, we're feeling festive but don't have this year's Christmas pictures to scrap yet with all the fabulous new Christmas supplies we've gotten. Scrapbooking "Christmas past" is a great way to share some scrappy Christmas spirit while we count down the days till Santa comes!

I found these wonderful pictures of my daughter from 2008 that had somehow never been scrapped, and decided to pair them with the Dear Santa collection from the brand new company Photo Play Paper (where I am social media manager).

To make this layout quick and easy, I grabbed my copy of Scrap Free Scrapbooking by Layout-A-Week's own Jennifer Priest. The book contains cutting patterns that create multiple color blocked layouts from just a few sheets of paper, but the individual layouts can also be used stand alone. I found the perfect layout for these photos in the book's first cutting pattern set.
Scrap Free Scrapbooking cover
As I assembled the patterned paper pieces that I cut following the pattern, I inked the edges of all of the pieces except for the background. This nice gray Antique Pewter by Colorbox gave the edges a nicer definition and separated the patterns from each other a bit. Below, you can see the difference between the effect of an inked edge and a plain edge.
The next step was to build a group of embellishments in an area of white space on the left side of the photos. Since the photos were from Christmas Eve, this number 24 from one of the "Dear Santa" patterned papers was the perfect starting point.

Since I didn't have a circle die or punch the correct size, I reached for my Westcott brand microtip scissors to cut it by hand. With the small blades and the microtip, I had enough control of the scissors that you really can't tell that I cut it by hand!
From the 24 circle as a starting point, I built outward using a holiday ephemera pack by Tim Holtz to create a collage look that I was happy with in the white space next to the photos along the edge of the gray patterned block.

Minor detail...I got into it and got to a point that I was happy with it and realized that absolutely nothing on the layout was glued down yet! This meant I would have to move the ephemera to glue down the patterned paper and photos! But my iPhone came to the rescue. I snapped a quick photo of the layout built how I wanted. I then started moving things to glue them, using the photo as a reference to get them back where I wanted them.
The key to a collage like this is that while the elements look random, they really are not. The circular items are place to keep the entire thing from looking too boxy. The long red strips visually connect the collage to the two photos and provide horizontal movement to what is otherwise a vertical element. The color themes of green, red and brown repeat, along with the holly on multiple elements.

The last two items that went on to the collage are the ones at the very top of the page - the stickers that say "2008" and "Twas the night before Christmas". These elements date the layout without it having to have a formal journaling block.

While I am usually pretty adamant about including journaling blocks on my layouts, I deliberately chose to let these photos stand alone without a story attached this time. The thoughts that accompany these photos, for me, besides the context of time and place, have to do with my daughter's autism and her health issues. Sometimes, as the parent of a child with challenges, you don't want those challenges invading every memory. I decided to save those thoughts for another day/layout, and just for this layout appreciate these beautiful pictures of my daughter for what they are.
The title block was created using another piece of ephemera to ground it. The words "holiday party" serve as a subtle sub-title and as a divider between the two words. The stickers are from the "Dear Santa" collection kit, while the word "Santa" is cut on my Cricut from a piece of paper in the collection pack. Like all my other intricate die cuts, it went through my Xyron machine to be adhered easily and perfectly.
The final result, when it's all pulled together, is a quick and easy layout that I created in one sitting with only a collection pack, an ephemera pack, and a few tools. But thanks to the patterns and the collage, it looks way more complex than it really is.

This little cutie is definitely on Santa's "nice" list!
Supplies:

  • Scrap Free Scrapbooking eBook
  • Photo Play Paper "Dear Santa" collection pack
  • Tim Holtz idea-ology "Festive" ephemera pack
  • Tim Holtz idea-ology "Occasions" Small Talk stickers
  • Cricut Explore machine 
  • Teresa Collins "Santa" cut file from "December 25th" Cricut cartridge
  • Colorbox Pigment Ink in Antique Pewter
  • Xyron 505 machine
  • Westcott 5" Pink Titanium Non-stick Scissors with Microtip