Friday, July 5, 2013

The Daily Scrapbook Page - Day 3


Yay! Day 3 of the Daily Scrapbook Page is here. This is a simple one to do with scraps -- all you need is a little bit of paper and some leftovers from another project!


Here's how I made it:


Supplies:
  • Paper, Chipboard Stickers by Bo Bonny Press
  • Double Dot Taupe Ribbon by Bo Bunny Press
  • ColorBox Fluid Chalk Cat's Eye Ink pad
  • Trims by hydrangeahippo.etsy.com

Please join us for another layout tomorrow!! Hope this inspires you to think of your scraps in a different way. No 12 x12 paper was harmed during the making of this layout....


Thanks for stopping by! If you enjoyed our blog, please subscribe and follow us here:
Facebook Twitter YouTube Pinterest Instagram Google+

Thursday, July 4, 2013

The Daily Scrapbok Page - Layout 2 ... and a Blog Hop!

This layout is part of a blog hop over on our other blog today!! Head on over and check it out... here is a little sneak peek!

4th-july-laout-clearsnap-by-jennifer-priest-detail-1

Start at http://blog.clearsnap.com after 9am Pacific on July 4, 2013. Enter for your chance to win one of our EXCLUSIVE Limited Edition 3 Color Red, White, and Blue ColorBox Pigment Inkpads!! Leave a comment below and use the handy dandy widget to be entered!

Button-300x250-The-Daily-Scrapbook-Page

Today I am sharing a fun layout as part of our "The Daily Scrapbook Page" series all this month here and on the Hydrangea Hippo blog. Subscribe to our YouTube channel, follow us on Facebook, and add our blogs to your RSS feed to get all the updates!!

4th-july-laout-clearsnap-by-jennifer-priest-detail-2 4th-july-laout-clearsnap-by-jennifer-priest-detail-3 4th-july-laout-clearsnap-by-jennifer-priest-detail-4 4th-july-laout-clearsnap-by-jennifer-priest-layout

Supply List:
See you on the hop!!!

Tuesday, July 2, 2013

The Daily Scrapbook Page - Layout 1

Now that I have the scrapbook bug again, I am revamping my blog, Layout-A-Week. So to kick that project off, I am going to post a video a day in July, starting today, showing how to do a scrapbook page from start to finish. I also realized it has been 3 years since we did a 20 Pages In a Day class -- can you believe that?! I had no idea it had been so long. No wonder I am so behind on my scrapping!

Button-300x250-The-Daily-Scrapbook-Page

Are you ready to get some scrapbook pages done? It's hot outside so grab a tall glass of lemonade and sit down inside to scrapbook every day with me! LOL The videos will posty daily to my YouTube channel and we'll be sharing the links here and on Layout-A-Week so be sure to follow us in BOTH places and via social media (you know, Facebook and stuff) so you get all the updates.

I will also be sharing how to create the pages from our 10 Layouts Kit on etsy so grab one before they sell out!! So here is today's layout, to kick things off, a page about Katie's Science Fair Project!

Daily-Scrapbook-Page-July-2013-Jennifer-Priest-Day1

This layout features elements from our "Petals and Pigtails" Kit available in our etsy shop and our "Vintage Mint" July 2013 Monthly Kit.


Supplies:
  • "Petals and Pigtails" Kit
  • "Vintage Mint" July 2013 Monthly Kit
  • Bo Bunny "Prairie Chic" Collection Kit
  • ColorBox Fluid Chalk Ink in Wisteria and Lime Pastel
  • ColorBox Archival Dye Ink in Tree Frog
  • Rollapgraph Jumbo Handle and Wheel - Parade
  • Kuretake*Zig Cocoiro Pen
  • Washi Tape by Hopscotch Crafts and Freckled Fawn
  • Bazzill Pom Pom Trim
  • Lace Scrap
Happy Scrapbooking!
Jennifer Priest Jan 2012

Wednesday, June 19, 2013

The Daily Scrapbook Page- Coming July 1

Now that I have the scrapbook bug again, I am thinking of revamping my blog, Layout-A-Week. So to kick that project off, I am going to post a video a day in July showing how to do a scrapbook page from start to finish. I also realized it has been 3 years since we did a 20 Pages In a Day class -- can you believe that?! I had no idea it had been so long. No wonder I am so behind on my scrapping!
Button-300x250-The-Daily-Scrapbook-Page
Are you ready to get some scrapbook pages done? It's hot outside so grab a tall glass of lemonade and sit down inside to scrapbook every day with me! LOL The videos will post daily to my YouTube channel and we'll be sharing the links here and on Layout-A-Week so be sure to follow us in BOTH places and via social media (you know, Facebook and stuff) so you get all the updates.

 I will also be sharing how to create the pages from our 10 Layouts Kit on etsy -- it is on SALE right now for etsy's birthday so don't miss out on that deal! Plus, watch our Saturday Morning Crafts video on YouTube for an extra 25% off coupon code on your entire order.
Happy Scrapbooking!
Jennifer Priest Jan 2012Signature Blog NEWSLETTER

Friday, September 30, 2011

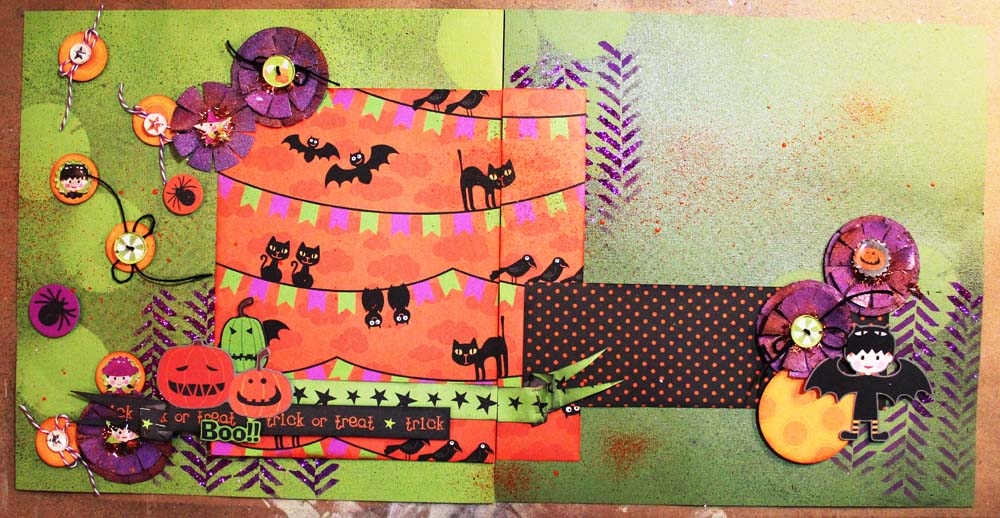
Layout 9: Trick Or Treat


I created this page for the Sizzix Fresh Vintage Blog Hop going on this week and the next 5 weeks!! I posted it here on the Clearsnap blog, where you can also join in on the Hop -- there are prizes ;)


 Here is my layout, ready for photos! I had a blast creating this with templates from Balzer Designs for Crafter's Workshop, TONS of Smooch Spritz and glitter, Epiphany Crafts tools, My Little Shoebox papers...so much to share!


Whenever I am prepping for classes or even diecutting just for myself, I always cut extras. While cutting the Flowers, 3-D Fringed from white duck cloth, I used the small and medium flowers for a class so I had lots of the large flower leftover in my stash. 


One of the biggest challenges I am facing in my scrapbooking right now is trying to make two page layouts when my background papers don't match. Well, who made that rule anyways?!?!? I have started using backgrounds that are just a few shades different from one another and then use spray ink and patterned paper to pull it all together.


Here I started with some patterned paper and two sheets of Bazzill cardstock, in different shades of green, I think Hilary and Lizard.


I laid some of my canvas flowers on the page to create a mask in three different areas (there's that visual triangle again) and a place for me to concentrate my embellies once I start designing the page.


I sprayed the page with Smooch Spritz in Silver Foil, concentrating on the areas the flowers were laid on.


Removing the flowers after spraying revealed the masked area.


Then I paid several paper towels flat on the page and patted it dry,. The Smooch Spritz will dry pretty quickly on its own but I used a quilted paper towel to dry it because the quilted image from the paper towel is then transferred onto the paper.


Then I used paint, a Crafter's Workshop template, and Clearsnap Glitter to add another decorative element to my cardstock base.


I painted portions of the template adjacent and partially overlapping the masked flowers. While the paint was still wet, I sprinkled on the glitter. The wet paint will act as an adhesive to keep the glitter in place.


Here's what my page looks like at this point:


I set the flowers I used as masks in a Color Catcher so that I could dye them purple with Smooch Spritz. I love cutting things from white because I can later use ink or paint to color them to match my project.


I sprayed the flowers with Smooch Spritz in Grape Burst until covered.


Then I depressed the nozzle of a Smooch Spritz in Carrot Cake halfway down and slowly pressed to create large droplets of ink for a splatter effect.


Here's the result--so cool!!! You can't buy flowers like these!


 I then set the flowers aside to dry and started back on my layout. I punched some circles from Orange PP and adhered them with Foam Dots to the left side of the page. I cut some other patterned paper to 9x8 for the left side of the page and 2x9 for the right side of the page, adhering flush to the seam between the pages.


Next I added a Strip of Dot PP to the right and two strips from the Border PP to the left, overlapping. I liek to cut strips from border papers, cut a notch in the end and then fold it over like a ribbon, stapling in place.It is an easy and affordable way to add dimension to a project. I also added a 3" punched circle to the right side of the page to carry the circles from the left...


Next I added 3D Foam Dots to the backs of several stickers and added them to the page.


After the flowers dried (about 30 mins) I started working with them, laying them out opn my page to see where they might work best.


The Die has 3 sizes of flowers for easy layering. But, since all of my flowers were the same size, I wanted to make them nest without cutting more. First I cut a pizza slice (or cake slice if you're a sweet, not savory person :P   ) from one of the flowers. 


Then I folded the petal to the right of the "missing slice" on top of the petal on the left of the "missing slice" and adhered them together. This results in a cone shape -just pressed the edges down to flatten it like I do in this photo:


Yes, I need a manicure! LOL Adhere the "smaller" flower to the center of an unaltered one for a layered look. This results in a sort of half layer - if I added the medium flower to this flower, it would nest inside the altered layer. Some day I plan to make a 5 or 6 layer flower using this same technique...I think it could be awesome!


I placed the flower on my layout and then set to adding centers made from Epiphany Crafts Buttons and Shape Caps as well as Sparkle Fibers by Clearsnap and a dash of twine from The Twinery.


To the centers of the flowers I added Sparkle Fibers with Glue Gloss--these are so fun!!


Then I created some buttons and epoxy shapes with the Epiphany Crafts tools as accents on my page. I used the Button 14, Button 20, Star, and new Scallop Circle tools to create accents from scraps of the patterned paper I used on the page. I tied twine from The Twinery in the buttons, with the bow on the back. The black jute cord is an old jewelry twine I had in my stash.


Finally I added two photo mats to the right hand side of the page:


Here are some detailed images of the flowers on the finished page:


And my finished page, awaiting photos:


Supplies:
  • Bigz Circles and Bigz Flower, 3-D Fringed Dies - Sizzix
  • Glitter, Smooch Spritz in Carrot Cake, Silver Foil, and Grape Burst, Sparkle Fibers in Root Beer, ColorBox Fluid Chalk Ink in Blackbird and Pumpkin Spice - Clearsnap
  • Paper, Stickers - My Little Shoebox
  • Paint - Delta
  • Black Double Dot Paper - Bo Bunny Press
  • Cardstock - Bazzill
  • Template - Crafter's Workshop by Balzer Designs
  • Twine - The Twinery
  • Jute Twine - hydrangeahippo.etsy.com
  • Round 20 and Round 14 Buttons, Scalloped Circle and Star Epoxies - Epiphany Crafts
  • Stapler- Tim Holtz Tiny Attacher
  • Fabric - Canvas Duck Cloth by Joann's