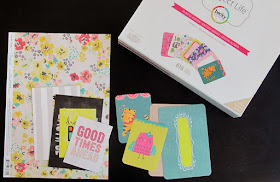
This year, I vowed to make use of the cards I already own. I have dusted them off and started giving myself freedom...freedom to create my own kits. If you find your cards are gathering dust as well, then perhaps you should join me as we make our own Project Life kits.
Step One: Pick the starting point for your kit
What every kit needs is a starting point.In some cases, the time of year or a set of photos may inspire the supplies you want to use. For example, if you are making pocket pages about summer activities, you would probably want warm, bright colors in your kit. Alternatively, a card pr piece of scrap paper may be your inspiration. Either way, choose a color scheme and stick to it! It's ok to go a shade up or down from the main palette but try to keep it all as close as possible. I also recommend trying to limit the palette to 5 colors or less. It will make it easier to keep a cohesive look. Let that color scheme drive your product choices.I started with the patterned paper piece shown in the photo above. From there, I chose a Project Life kit with a similar color scheme. Not all of the colors from the core kit fit my palette, so I simply opted to discard the cards that didn't fit. I also chose a few cards from my kit club subscription.
It may be difficult to know how many cards you will need. Take a look at your photos and you will have a general idea. The great thing about making your own Project Life kit is that, should you need more supplies, you simply need to shop a bit more in your stash.
Step Two: Pick a selection of embellishments
Choose a variety of embellishments to complete your Project Life kit.Keep to the color palette, but also consider how those embellishments will contrast or compliment the cards and papers you picked.
I chose a mix of ribbon, tape, wooden embellishments, jewels, enamel dots, rub-ons and stickers.I try to use flatter embellishments on my pocket pages since many of the pocket style page protectors are not as forgiving as a scrapbook layout page protector. This is also the opportunity for you to create some embellishments. I used my Westcott Brand craft knife to fussy cut some flowers from a scrap piece of patterned paper.
Now that your project life kit is ready, it's time for you to create with it!
 |
Supplies Used:
Patterned Paper by Crate Paper
Pocket Page Cards from Cocoa Daisy, Becky Higgin's Project Life
Rub-Ons by Dear Lizzy
Wood Shapes by Shimelle, Dear Lizzy
Stickers by Heidi Swapp
Tape by Amy Tangerine
Craft knife by Westcott Brand


No comments:
Post a Comment
Leave us some scrappy love!